Showing posts sorted by relevance for query RV. Sort by date Show all posts

Wednesday, March 13, 2024

RV#3 (a drone) has been Completed

This minature robot vermin is propelled by a electromagnetic process. We assume, like the others, that this unit was designed by an AI to provide security and defense capabilities. It was fashioned from a piece of PVC pipe, polystyrene sheet, micro-tubing and strips, material from bread clips, a small piece from a pen pocket clip used for a sensor, a couple random bits from the junk box (two greyish greeblies on the front and back and the rectangular bit on the top of the drone, the propulsion unit was created using a cap from some sort of tube, and lastly I used two greeblies from my model train accessories collection, those typicaly used to detail diesel engines; also on the top of the unit.

Side view

Back View

Standing in front of a US half-dollar


Number 4 is in the works. See number RV1 and 2 here:

Monday, February 19, 2024

Robot Vermin #2, Complete

All that is needed is some paint.


I used material from a sprue like this for the robots appendages.


Stanley stands tall next to the little robot. That is American quarter between the two of thmm.


RV#3
RV#1

Thursday, March 7, 2024

RV Makeup

The inspiration for these robot vermin came from Head Bunny's 28mm robot vermin collection. Building these miniature robots allows me to use those small plastic bits I have collected.

RV1 Drone

Polystyrene round and square tubing, added micro rod. I used a kit part and a piece of a sprue on the top of the unit. I also used other bits of sprue for sensors. For the fins I used material from bread ties.

RV2 Security bot

Polystyrene square tubing, styrene sheet and micro rod. The sensor on the top of the unit was created with a small bit of styrene that I carved into shape and then I added bits of micro-rod. The appendages were created from bits from a sprue. Lastly, I added a few greeblies that I either had on hand or I created purposely for this unit.

Neither of the RV units are larger than a US dime, nor built to any specific scale. Are you kidding? I haven't seen any scale drawing for these micro robot vermin.

Saturday, March 9, 2024

RV #3, an Update

RV #3 is coming along. As is normal for me, I have gotten side-tracked and am putting together materials for my next project and I am brainstorming a CV#4.

Thursday, March 28, 2024

What is on your Workbench - Spare Parts

Spare Robot Parts - Arms, and Propulsion Units

Although I am putting finishing touches on my RV's five and six, I have started to ponder what my next project(s) will be? With the spare robot parts I am planning on building a robot or two. In addition, I have laid out the sides for a hover car. I don't know which project will get priority, but any rate, I do have, at least, two projects for next month.

Saturday, March 30, 2024

Four Becomes Five and Five Four - RV #4 Complete

My forth robot vermin will become my fifth as my fifth bcomes number four. I had been working on these two simultaneously. When the former became too tedious I would switch over to number five.

This robot vermin stands about as tall as a US half dollar or approximently 34mm. The unit represents a intrusion detection sensor. It would, using a small hydrogen fuel cell, fly to it required location. Once there, it would land, the fins would be blown off by the means of a small charge, and using the built in cutting edges the unit would start to drill itself into the ground. Once at the required depth it would connect to the perimeter network and start to do its job in intrusion detection.

Friday, March 1, 2024

RV#3 is Under Construction

My third robot vermin is under construction. The reason I haven't completed this unit is that I have become side-tracked on more than a few occasions while experimenting with differnt techniques and processes for creating bits of greeblies for my robots.

Saturday, March 16, 2024

Materials for RV#4 - RV4 in Process - Changes To...

Changes to... in Process...

I have decided to switch to 1 by 4's instead of the 2 by 4's I had been using. I didn't care for the way looked upon the cylinder core. I am also had a little difficulty with the placement of the strips with the tweezers that I have and have made some alterarions to my pair so that they may hold the very fine bits of strips.

A last minute thought: I wish I add alternated between the 1 by 4 and 2 by 4's. It would have created a nice effect.


Materials for...

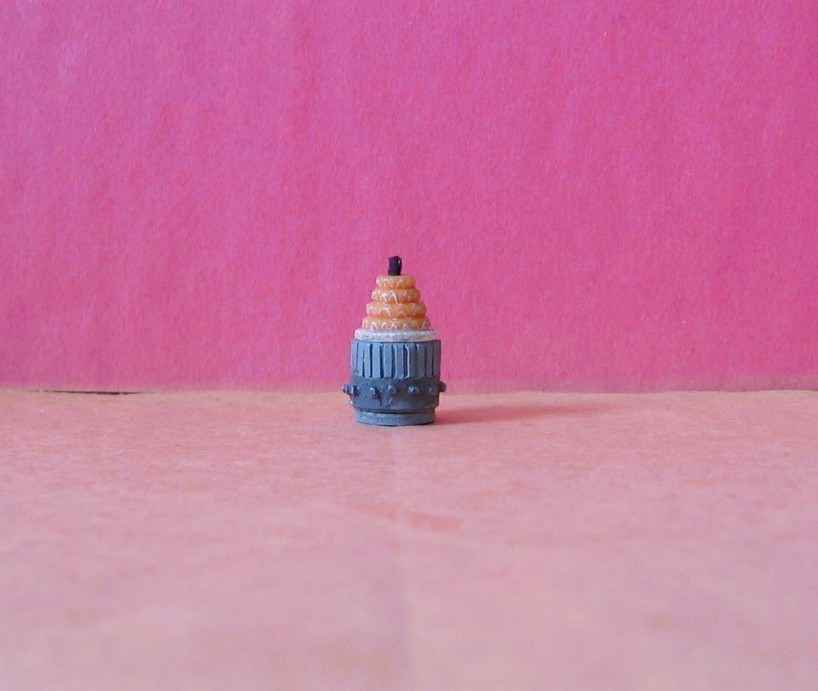
I am pulling materials together for the robot vermin number four. What you see here is the unit under construction. I used a floss role for the body, wrapped a very this strip of styrene around the bottem, and I startd to add styrene strips to the top half. Below are a strip of 1mm round rod and a strip of HO guage 2 by 4 material. The piece of to the right is something I picked-up in my travels. Not pictered here are the are rivets I fachioned from a piece of 1mm round rod. They will be added to the white band at the bottum of the unit. I haven't decided on how this unit will be propelled yet.

Sunday, April 7, 2024

Fiddling Materials

One and three milimeter polystyrene bits.

I do use a lot of 1mm thick styrene, not for any real reason, I just have a lot of this sized material on hand. If thicker material is needed you can laminate several thiner sheets to the desired thickness.

I have seperated my plastic bits and have organized them by size. Since starting my RV project I have been using my leftovers for small details and greeble on my models.Outside of some trimings this small collection is all I have left of these smaller bits. I use these to fashion components for my models, such as applicators, hatches, and sensor fixtures.

One, two and a half, and three milimeter polystyrene bits.

I always start a new project with the right sized plastic sheets and usaully will cut something of from these leftover bits if I don't already have a piece at an appropriate size.

Thursday, April 11, 2024

RV # 5 and Bonus Unit Completed

A cake topper, if you will. Although I did create a sixth unit, displayed below, this is the last robot vermin in this series for a while. I have desinated this unit as a security drone. The drone started out as a plastic tube inside a floss container. The material in which it was manufactured was of some waxy type of plastic, which at first, I didn't believe regular model cement would adhere strips to the cylinder. So I started of using super glue which made the process too fiddly. Things went better when I started to use model cement. I glued scale 1/4 strips around the spools diameter. The bottom was wrapped with a band of very thin styrene and I added scratch built rivets. The topper is a mystry, a part from my greeble collection.

This unit is signal repeater which picks up signals from other devices, amplifies the signal and pushes it out to the corresponding device. There is also a small storage area of a terabyte or two. Operating systems and the small bit of data that might be found on each device are also stored here to help restore necessary files quickly.