Showing posts with label chicken coop. Show all posts

Thursday, September 16, 2021

The 6 x 6” Square of Cardstock Challenge

I initiated this project back in May of this year and probably got started in earnest in June and am just now completing my chicken coop. The idea was to create the structure totally out of one piece of cardstock that measured 6 by 6 inches. I was to use the same piece of cardstock for the sub-walls, clapboard siding, roof, floor, and door.

I did use a few strips of black construction paper for the roof and two wooded match sticks for the foundation. As a afterthought I am going to add Campbells corrugated material to the roof and weather these panels heavily.

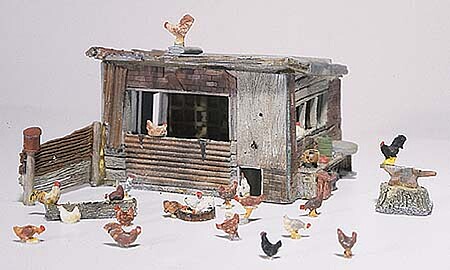
As you can see, I weathered the structure heavily. I painted the completed structure with “Barn Wood” and then dry-brushed the “Wicker” white and then scrubbed it with white chalk. The door is scratch built and it was dry-brushed with in green, as were the windows. The windows if you remember are from some plastic kit that ended up in my box of the same.

I am looking forward to starting my next structure, a goods warehouse. It will be constructed from cardstock, embossed paper, and distressed wood panels. I made a post here that explained the inspiration for its creation and a few ideas I had for its construction.

Satisfaction Scale: 3 out 5.

Monday, May 24, 2021

Build a Chicken Coop Out of a 6 x 6”Square of Cardstock Challenge

I was rummaging through my windows and doors resource box looking for just right set of windows for a project I was working on and I came across this set of windows. I believe it was a Polo greenhouse kit (perhaps not). I took notice of the casting and I thought chicken coop. I finished my exploration, dropped the casting back into the box and went on to something else.

The other day after bringing in an item that was needed for my home I took note of a 150 x 150 mm piece of a 1mm cardstock. It had been part of the packaging. As always I grabbed it with the idea of storing away with my “paper” resources, but then decided that I might have need of it for a project. The project; I cannot say I remember what it was. I must have come-up with another solution for the project and so here again is that square of cardstock.

The structure will measure scale five foot wide by fifteen feet long. It will be topped with a flat shed roofed that will be eight foot high slopping down to seven feet. I will use the slightly modified plastic casting for the windows.

The challenge: to build the structure and its components from this one piece of cardstock. I believe I can get the sub-walls, doors, roof, flooring, and clapboard siding out of the one piece of cardstock. That is the challenge.

To be quite honest I am a little concerned on whether I will enough clapboard material to cover the whole structure. We will see. And of course I will need material the foundation and the roof itself.

Tuesday, September 17, 2013

Abandoned Chicken Coop Project

After several attempts I have decided to abandon my Woodland Scenics Chicken Coop. After painting and weathering the walls and roof of the structure I cannot get the walls to assemble squarely and of course the roof meant to fit snuggly on top of a squared structure will not fit squarely either.

If I want a chicken coop on my layout I have a few different options. I could either scratch build or kit bash one if a suitable structure could be found. I am leaning more toward the scratch built idea, where as the structure need not be all that elaborate.

There two ways I am thinking about building a chicken coop, in fact why don’t I just build two. The first idea would be a rectangular structure with a sloping roof. The structure would sit on four concrete posts; include a full sized door to allow for easy egg removal, a set of paned windows on the front of the structure, and three or four small hinged ramps that would allow the chickens out to roam out in fenced pen.

The structure could be creating using a variety of materials I have on hand. I could use strip wood and do a board on board approach or use clapboard styrene sheet. Since the chicken coop would be an out-building and placed toward the back of the layout the later mentioned method will be fine, I don’t need all that much detail for a structure that is not going to be out front. Still, using styrene clapboard siding and a set of modified window casting from my junk box would provide enough detail to satisfy my needs. Of course the pen would be populated with chickens and a sneaky fox looking for a way to get to the chickens could be placed in nearby bushes.

I will have to draw-up a plan for the structure I have in mind and lay my dimensions down on styrene sheet. Once these plans are complete I will upload them.

The other idea for a chicken coop would take a little more planning. I will try to mimic the detail in the Woodland Scenic casting, by using a combination of brick, stone, metal siding, and clapboard sheets for the walls and create a set of ramshackle windows. I might just start with this model, since it seems that it might more fun to build than the other. There again, I will have to lay out some plans for this structure, not forgetting the structure would have to mimic one that was “slapped” together.

Friday, September 13, 2013

1/87 Woodland Scenics Chicken Coop

The Woodland Scenics Chicken Coop kit comes with a wealth of details, both inside and out. The kit consists of nine white metal parts, plus a spruce with twelve chickens. I have decided to leave the details for another time and will build the chicken coop.

The structure has many details that are cast in to the kit pieces. The kit consists of a front and back, two sides and the roof. The structure seems to be thrown together piece meal and with a verity of materials, there are some bricks, board, corrugated material, and a piece of plywood.

Having stood the pieces of the structure up together after I had cleaned up any flash and parting lines, I noticed that depending on where I sat this structure I wouldn’t have to be too concerned about the interior details of the structure

I spray painted the five pieces and front and back with a cheap flat white spray paint. Since there is such a verity of building materials represented in the casting I have decided to paint the walls as they lay flat on my workbench before gluing them together.

I used one of my favorite techniques for representing corrugated material; I painted the interior with Pactra, Dark Gull Grey and gave everything a good black wash. This seems to represent old corrugated metal rather well. The chicken nesting boxes received a coat of tan and I then picked out the few chickens that were represented here with a little dabs of white paint.

Like I mentioned earlier, the structure seemed to be thrown together, or perhaps it was patched together with whatever materials there were at hand. On the outside of the structure there are some bricks, corrugated sheet, a piece of plywood, clapboard siding and some board and batten. All of this will make for a very interesting presentation. There are also a few details that will also have to picked-out with an appropriate color.

The structure is sitting on my workbench, only needing some touch-up paint, dry-brushing and weathering and I will upload an image of the model as soon as it is complete.

Wednesday, May 22, 2013

A Chicken Coop in 1/48

I started my 1/87 chicken coop a couple of months ago. It sits unfinished on my workbench, with so many other projects in various stages of completion. I found this unique chicken coop complete. From the picture, you can see that the model was created using a real prototype as a guide.